
Deer Feeder Batteries: Best 6V & 12V Picks (2026)
Research-based buying guide • Updated October 5, 2026
Affiliate disclosure: As an Amazon Associate I earn from qualifying purchases. Amazon buttons below open model-specific search results; verify the exact model and terminal variant before purchasing.

The best deer feeder batteries match the voltage, terminals and compartment specified by your feeder’s manufacturer. A feeder that lights up but never throws corn may have a weak battery, a loose connection or a mechanical problem. This guide helps you compare compatible 6V and 12V options without choosing a higher voltage as a shortcut.
This guide compares deer feeder batteries by use case, explains why a “full” battery indicator can mislead you, and gives you a repeatable check before leaving the property. If you are choosing the whole setup, compare our best deer feeders first, then match the replacement battery to the exact motor kit.
How we researched this guide: We used manufacturer specifications and troubleshooting guidance alongside the supplied research dossier’s summaries of owner discussions and buyer feedback. Many older forum reports were available only as search excerpts. We did not conduct hands-on battery tests, watch the cited videos, or verify full Amazon or Facebook review histories. Recommendations below reflect compatibility and documented specifications, rather than a measured performance ranking.
Table of Contents
Best deer feeder batteries by use case
Start with the old battery’s label and your feeder manual. A listing that says “deer feeder battery” does not establish compatibility with every Moultrie, Wildgame, Boss Buck, or Texas Hunter model.
| Option | Documented specification | Best-fit situation | Check before buying | Amazon options |
|---|---|---|---|---|
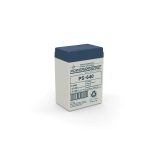 Power-Sonic PS-640 F1 Power-Sonic PS-640 F1 | 6V, 4.5Ah AGM; F1 tabs; 2.76 × 1.85 × 4.17 in including terminals | A compatible 6V feeder using tab connections | Tab size, connector fit, and lid clearance | Check prices on Amazon ↗ |
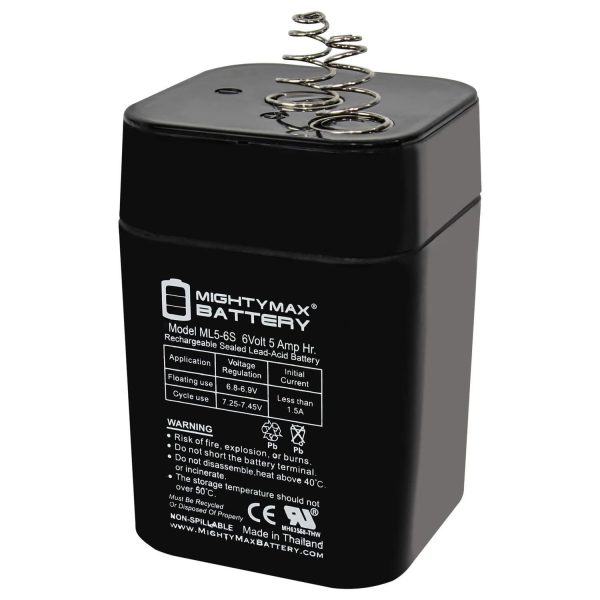 Mighty Max ML5-6S Mighty Max ML5-6S | 6V, 5Ah AGM; Spring S2 terminals; 2.63 × 2.63 × 4.50 in | A compatible 6V feeder with spring-contact battery connections | The S2 spring-terminal variant, not just the ML5-6 family name | Check prices on Amazon ↗ |
| Mighty Max ML7-12 | 12V, 7.2Ah AGM; F1 terminal model | A 12V system whose manual permits this battery size and connection | Compartment dimensions, connectors, and required capacity | Check prices on Amazon ↗ |
| Texas Hunter battery-and-solar feeder kit | Manufacturer-listed 12V kit with battery and solar charger | A complete compatible system purchase or approved kit replacement | Exact kit contents and mounting compatibility; this is not a battery-only comparison | Check prices on Amazon ↗ |
Specifications are manufacturer-listed, not measurements from our own testing. Links above go to manufacturer information. Prices and stock change; check the exact variant before ordering.
For a tab-connected 6V feeder: Power-Sonic PS-640 F1
The PS-640 is a sensible candidate when your feeder requires a compact 6V AGM battery with F1 tabs. Its documented shape makes it easy to compare against an existing compartment. It is not interchangeable with a lantern-shaped spring-top battery merely because both say 6V.
Choose it if: your manual, compartment, and connectors match. Pass if: your feeder uses spring contacts or requires a different capacity. The available research does not establish that it outlasts every competing brand.
For a spring-contact 6V feeder: Mighty Max ML5-6S
The useful distinction here is the Spring S2 terminal arrangement. The manufacturer lists this model as a rechargeable 6V 5Ah AGM battery for applications including game feeders. Confirm the exact model on the purchase page because similar product names can describe different terminal versions.
Choose it if: the spring contacts and stated dimensions match your feeder. Pass if: your wiring expects flat tabs. A slightly higher Ah figure is not proof of longer field life across different battery designs.
For an approved 12V replacement: Mighty Max ML7-12
The ML7-12 listing specifies 12V, 7.2Ah, and F1 terminals. It belongs on the shortlist for feeders that explicitly accept this configuration. It is not a voltage upgrade for a 6V feeder.
Choose it if: your 12V system’s requirements match. Pass if: the battery is too large, the connector differs, or the manual specifies another battery. Do not use reviews of unrelated alarm or mobility applications as evidence of deer feeder lifespan.
For a complete system: a manufacturer-matched battery and solar kit
If you are replacing an entire motor-and-timer assembly, an approved kit can simplify component selection. Texas Hunter lists a 12V wildlife feeder kit bundled with a battery and solar charger. Compare the full system cost against replacing only the failing part.
A larger hopper alone does not prove you need 12V. The installed motor, timer, feed schedule, and mechanical load determine the electrical requirements.
6V vs 12V deer feeder batteries: what actually changes?
Voltage describes the supply the system is designed to use. Amp-hours describe rated charge capacity. Neither number alone tells you how far the feeder throws corn or how many months it will operate.
| Your situation | Practical choice | Reason |
|---|---|---|
| A working feeder specified for 6V | An approved 6V replacement | Preserves the intended motor and timer supply |
| A feeder specified for 12V | An approved 12V replacement | A 6V battery is not an equivalent substitute |
| You want a different throw pattern | Compare complete feeder assemblies | Motor design, spinner geometry, feed, and adjustment also affect spread |
| The feeder runs frequently | Assess approved capacity and charging | More daily motor time increases consumption |
| The feeder sits in shade | Plan charging access or a panel relocation | Higher voltage does not fix inadequate sunlight |
The dossier’s hunting-forum summaries describe owners preferring 12V systems for throw and torque, while others were satisfied with 6V setups running brief feedings. Those observations compare different systems and conditions. They do not demonstrate that doubling voltage on an existing feeder is safe or that 12V always lasts longer.
Compare watt-hours when the voltages differ
For a rough nominal energy comparison, multiply volts by amp-hours. A 6V 5Ah battery represents about 30Wh; a hypothetical 12V 5Ah battery represents about 60Wh. These are calculated label values, not measured usable energy.
A 12V system may also use more power. Actual runtime depends on motor demand, startup current, battery condition, temperature, controller consumption, and charging. Equal Ah ratings at different voltages are not equal energy ratings.
AGM, alkaline, or lithium: which battery type makes sense?
| Type | Where it fits | Main limitation |
|---|---|---|
| Rechargeable SLA/AGM | A feeder designed for rechargeable lead-acid and a compatible charger | Needs appropriate charging and storage; weight and aging matter |
| Non-rechargeable alkaline | A feeder explicitly designed to accept that battery type | Replacement frequency depends on use; never connect a charging system |
| LiFePO4 | A feeder and charging system approved for the particular lithium pack | Charging profile, cold protection, and motor-start current require checks |
AGM is a type of sealed lead-acid battery. “SLA” and “AGM” therefore need not mean competing chemistries. Read the complete specification rather than choosing from a listing headline.
When is lithium worth considering?
Lithium deserves a closer look when frequent servicing makes a compatible upgrade attractive. It does not deserve an automatic “best overall” award from the evidence available here. The dossier found limited independent feeder-specific testing.
Before ordering a LiFePO4 pack, verify its voltage range, dimensions, connections, supported charging profile, and battery management system’s ability to handle motor startup. Ask whether low-temperature charging protection is included and how your solar system will behave when that protection activates.
Dakota Lithium’s troubleshooting guidance says most LiFePO4 batteries should not be charged below 32°F (0°C) unless internally heated. A pack advertised as operating in cold weather does not necessarily permit charging at the same temperature. Follow the exact battery manual.
How long do deer feeder batteries last?
Separate two questions: how long until the next recharge and how long before the battery needs replacement. A solar-assisted battery may remain charged between visits while still losing capacity as it ages.
The dossier contains both multi-year service reports and early failures. That spread is useful evidence of variability, not a basis for promising a fixed lifespan.
| Reported setup | Owner-reported outcome in the dossier | What it tells you |
|---|---|---|
| 6V analog feeder; two 5-second runs daily | Approximately three years per battery in one GON discussion | Some light-use setups can have long service life |
| 6V rechargeable with solar | Approximately two to three years before replacement in a TractorByNet discussion | Maintaining charge can support extended service |
| Non-rechargeable 6V; four 6-second runs daily | Approximately six to eight weeks in a Go2GBO discussion | Feeding frequency changes replacement needs |
| Two shaded feeders | Battery removal and recharging every three to four months in a 2Cool discussion | A connected panel is not proof of sufficient charging |
Historical anecdotes summarized in the supplied dossier; not independently reproduced tests. Battery brands, age, climates, and charging conditions differ. Source links appear below.
Why feeding schedules change battery demand
Two 5-second feedings total 10 seconds of motor operation daily. Six 10-second feedings total 60 seconds. If motor current stays the same, the second schedule uses six times the motor-run charge. Timer consumption and startup effects mean total battery demand will not necessarily increase by exactly six times.
For illustration only, a motor averaging 3A for 20 seconds per day consumes 3 × 20 ÷ 3,600 = 0.0167Ah per day during those runs. This is an assumed example, not a measured feeder draw. Dividing battery capacity by that number would omit standby demand, usable-capacity limits, weather, and charging losses.
Solar charging for deer feeder batteries: panel and charger compatibility
Use a solar charger designed for your battery voltage and chemistry, with connections approved for the feeder. “6V” or “12V” on a feeder solar product describes its intended battery system; a raw panel’s output rating alone does not establish a safe charging arrangement.
- Match the battery system. Select an approved 6V charging product for a 6V battery or an approved 12V product for a 12V battery.
- Match chemistry. Confirm that the charger or controller supports AGM or LiFePO4 as appropriate.
- Check current limits. Use the exact battery manufacturer’s charging instructions. “Low amp” is not a universal specification.
- Inspect sunlight at the panel. Check shade during the day and across seasons. Leaves, dust, and a poor mounting angle can undermine charging.
- Protect connections. Look for weather exposure, loose contacts, and animal-chewed leads.
- Confirm reverse-current protection. Ask the manufacturer whether the solar charger already provides it.
The dossier includes an owner account of a blocking-diode modification. That is not a general wiring prescription. A diode cannot turn an unsuitable 6V charging system into a correctly designed 12V charger. Use approved charging equipment rather than copying an improvised fix.
For charging at home, a compatible automatic charger is useful only when its voltage, chemistry setting, and current suit the battery. A charger suitable for a large vehicle battery may be inappropriate for a small feeder battery. Never charge a non-rechargeable alkaline battery.
Battery reads full, but the deer feeder will not spin
Start by separating a battery fault from a connection, timer, or mechanical problem. Keep hands clear of the spinner during powered testing. Disconnect power before inspecting moving parts.
Boss Buck documents a specific indicator trap: its Simple Set timer can show a full indicator at 6V even though a 12V motor will not run from that supply. That warning applies to the described system; other timers may behave differently.
| Symptom | Possible cause | Useful next check |
|---|---|---|
| Display works; motor does not | Weak battery, wrong supply, poor connection, or jam | Confirm required voltage and try a known-good approved battery |
| Motor runs weakly | Voltage drop or mechanical drag | Inspect terminals; disconnect power before checking the spinner |
| Replacement battery soon goes flat | Insufficient charging or excessive load | Review sunlight, charger compatibility, wiring, and run schedule |
| Lithium stops suddenly | BMS protection or another system fault | Check battery manual for temperature, current, and low-voltage limits |
| Failure appears after a cold snap | Reduced battery performance, frozen mechanism, or charging restriction | Inspect each possibility instead of assuming voltage is the only problem |
A voltage reading at rest does not prove that a battery can start a motor. If the manual permits electrical testing, compare voltage at rest with voltage during the test cycle. Keep the multimeter in voltage mode; placing current-mode probes across a battery can create a short circuit. Ask a qualified technician if the procedure is unfamiliar.
Cold-weather care and off-season storage
Before cold weather, charge deer feeder batteries with their approved charger, test the feeder, inspect the terminals, and check panel exposure. A marginal connection or sticky spinner may become obvious when conditions worsen. Use our deer feeder timer programming guide to check the schedule before blaming the battery.
Record the battery’s installation date and inspect it before important trips. For lead-acid storage, follow the manufacturer’s charge and refresh instructions. Power-Sonic says its PS series may be stored for up to six months at 77°F (25°C) before a freshening charge, with shorter intervals at higher temperatures. Other batteries can have different requirements.
For lithium, use the pack’s specified storage charge and temperature limits. Do not assume that instructions for AGM also apply to LiFePO4. Do not improvise heating or battery-revival methods.
A simple battery log for your next feeder visit
These records can reveal a charging problem before you buy another battery. A voltage reading should include whether it was taken at rest or under load.
| Date / feeder ID | Battery model / installed | Runs × seconds per day | Panel / shade | Voltage / test result | Action |
|---|---|---|---|---|---|
| ________ | ________ | ________ | ________ | ________ | ________ |
| ________ | ________ | ________ | ________ | ________ | ________ |
| ________ | ________ | ________ | ________ | ________ | ________ |
Frequently asked questions
Can I use a 12V battery in a 6V deer feeder?
Only if the manufacturer explicitly approves that supply for the complete system. Check the motor, timer, wiring, and charging equipment. Historical reports of successful modifications do not prove your feeder is compatible. Use an approved conversion kit if one is available.
Will a 6V battery run a 12V deer feeder?
Do not treat it as a substitute. Boss Buck states that its 12V motor will not turn on only 6V. Use the battery specified for your model.
Is a higher Ah battery better?
It can provide more rated capacity at the same voltage, but it must fit and meet the system requirements. Check connectors, charging limits, and manufacturer approval. More Ah does not repair a failed charger.
Do I need solar for my deer feeder?
Solar is useful when a compatible rechargeable battery and adequate sunlight allow it to keep up with demand. A shaded feeder may still need battery swaps or home charging. Non-rechargeable batteries must not be connected to solar charging.
Are two 6V batteries the same as one 12V battery?
Connection matters. Two equal 6V batteries in series give nominally 12V with the same Ah rating as one battery. In parallel they remain nominally 6V with combined Ah capacity. These arrangements do not establish feeder compatibility; follow an approved system design.
What is the best battery for a Moultrie or Wildgame feeder?
Choose by the exact feeder model. Brand name alone does not identify voltage, terminal arrangement, battery shape, or charging compatibility. Compare the manual and old battery with the replacement specifications.
What should I take when replacing a feeder battery?
Take the approved, charged replacement; the feeder manual; suitable tools; and a way to record the test result. Inspect solar leads and terminals while you are there. Run the manufacturer’s test cycle before leaving.
The five-minute buying check that prevents the wrong battery order
The most expensive replacement is often the one that arrives before you discover it cannot connect to your feeder. Shopping by voltage alone misses the details that determine whether the battery can actually be installed. Before comparing brands, make a small record of your current setup. A phone photograph of the battery label, connections, and compartment is often more useful than trying to remember a product name from the last hunting season.
First, identify the exact feeder or motor-kit model. A hopper may have one brand name while its replacement timer or motor assembly has another. If someone has modified the unit, the hopper’s original specification may no longer describe the electrical system. Check the installed components and the manual that belongs to them. When the labels disagree, resolve the mismatch before buying a battery.
Second, record the battery voltage, capacity, and chemistry. Write down the complete model suffix as well. Letters or numbers after a battery family name can identify a terminal version. This matters when a seller uses one main listing for several configurations. The picture in the search results may show a different variant from the one selected in the ordering menu.
Third, measure the compartment rather than assuming the replacement matches. Check usable length, width, and height with the lid closed. Include space for terminals, attached connectors, wires, and any retaining strap. A case can fit while its terminals leave insufficient clearance. Do not force the lid onto the battery or route a wire where the enclosure can pinch it.
Fourth, inspect how the battery connects. Spring contacts, flat tabs, and other arrangements are not interchangeable without an approved connection method. A connector that barely grips a terminal can introduce an intermittent fault that looks like a bad battery. A correctly matched battery should connect securely without improvised packing, exposed conductors, or pressure from the lid.
Finally, read the charging label. Record whether the feeder uses a solar accessory, an internal controller, or a battery that is periodically removed for charging. Include the charger’s model in your notes. If you change chemistry, revisit the charging system rather than assuming the old accessory will work. This short checklist turns a vague replacement search into a precise parts purchase.
Copy this information before opening Amazon
| Item to record | Your information | Why it matters |
|---|---|---|
| Installed motor / timer model | ________________ | Establishes the actual system requirement |
| Voltage / chemistry / Ah | ________________ | Identifies electrical and charging requirements |
| Terminal type and model suffix | ________________ | Avoids ordering the wrong connection variant |
| Usable compartment dimensions | ________________ | Includes clearance for leads and lid closure |
| Solar accessory / home charger model | ________________ | Allows a complete compatibility check |
What real owner feedback adds—and what it cannot prove
Owner feedback is useful because it describes problems that a specification sheet cannot predict for every property. A hunter may have a shaded panel, an old battery, long service intervals, or a feeder that runs far more often than yours. Those differences help explain why one person reports years of trouble-free use while another reports an early failure. They also make a simple average of forum lifespans misleading.
For this guide, we separate three evidence levels. Manufacturer documentation supports the listed voltage, shape, terminal type, and stated operating requirements. Directly readable buyer feedback supports what a particular reviewer reported. The supplied dossier’s forum summaries support historical accounts with an additional limitation: many original threads were not fully accessible. None of these categories replaces a controlled, repeatable battery test.
A readable buyer-review example: Mighty Max spring-top batteries
On the manufacturer’s 6V 5Ah replacement listing, a December 2019 reviewer reported about six months from one battery but less than two weeks from a replacement. Another, in September 2019, described a battery still running after three weeks with two daily feedings. These are historical seller-hosted reports, not independently verified performance results.
The practical lesson is to test a replacement promptly and retain its purchase details. Short-term success establishes that it operated in that installation; it does not establish multi-year service life. Seller-site feedback may also be affected by moderation or selection, so it should be read alongside the specifications and warranty terms.
What to look for in Amazon reviews
When you follow a check-price button, read the reviews for the exact variant selected. Useful reviews identify the feeder model, battery age, feeding schedule, solar setup, and length of use. “Works great” after installation provides less evidence than a follow-up covering a full season. A complaint about a battery that does not fit may reveal a variant-selection problem rather than an electrical failure.
Also separate delivery problems from field performance. Shipping damage, the wrong terminal version, a missing accessory, and a battery that will not hold charge describe different issues. Look for repeated, specific patterns instead of counting every negative comment as the same defect. This guide does not claim to have reviewed a complete current Amazon review dataset.
How to use hunting forums, Facebook groups, and videos responsibly
A detailed owner discussion can suggest a useful inspection, such as checking a shaded panel or a loose connection. It cannot establish that another feeder will behave identically. Facebook posts and video comments are especially easy to overinterpret when the original setup is unclear. Treat modifications as leads to investigate with the manufacturer, particularly when they involve changing voltage or chemistry.
The dossier links a YouTube video titled “6v Solar Panels Test/Review (for deer feeders)”. It is included here as a viewing resource, not as a test whose results we independently confirmed. Before applying any demonstration, identify the battery, panel, measuring method, and conditions shown. A video of the feeder spinning establishes a moment of operation, not a season of reliable charging.
Choose a maintenance plan for your property

The right battery decision changes with access. A feeder behind your house can be checked much more easily than one on a lease several hours away. The battery specification still comes from the equipment, but your service routine should reflect how costly a failed visit would be. The following situations are planning examples, not reports from our own field trials.
Scenario 1: a nearby property with regular visits
If you visit frequently, an approved rechargeable replacement and a reliable home charger may be sufficient for your routine. Record the installation date and test the feeder when refilling it. A spare can reduce downtime when you need to remove the working battery for charging, but it also needs its own storage and inspection routine. A neglected spare is not reliable backup.
Frequent access makes it easier to investigate a changing pattern. If the feeder starts more slowly on successive visits, compare battery condition, connections, and mechanical resistance. Record what you changed instead of replacing several components together. That gives you a better chance of identifying the actual problem before the next purchase.
Scenario 2: a distant lease with limited service opportunities
For a distant property, plan the whole visit. Take a known-good, approved battery and the tools needed for normal servicing. Check charging accessories before the season, and inspect the panel at the actual mounting position. A dependable charging arrangement may be more valuable than higher-capacity deer feeder batteries that still go flat because the panel spends the day in shade. Our deer feeder placement guide covers access and location decisions; assess solar exposure at the panel separately.
Calculate the value of avoiding an extra trip with your own costs. Include fuel, travel time, and access constraints when comparing a battery-only replacement with a charging-system repair. This does not mean the most expensive battery is automatically the best. It means that the cheapest item price is only one part of your maintenance expense.
Scenario 3: a shaded woodland location
Shade deserves its own diagnosis. A panel may receive morning sun during one visit and lose most of that exposure as trees leaf out or the season changes. Check the sun reaching the panel rather than the light reaching the top of the feeder. Relocating a compatible panel may help, but any cable extension needs manufacturer approval for its length, connection, and outdoor use.
If sufficient solar exposure is unavailable, a planned swap-and-charge routine may be more predictable. Do not assume a larger battery permanently fixes an energy deficit. It can provide additional reserve in an approved system, but a setup that repeatedly consumes more charge than it receives will still need attention.
Scenario 4: an app-controlled feeder with additional electronics
A connected system can have demands beyond a simple timer and brief motor runs. Check which components use the feeder battery and which have independent supplies. Do not assume that adding a camera or remote controller leaves consumption unchanged. Use the instructions for the complete configuration, especially if an accessory changes wiring or battery requirements.
Our camera and app-controlled feeder guide helps distinguish a connected feeder from a separate camera pairing. That distinction matters here because a camera aimed at a feeder does not automatically share its battery or report the battery’s condition. Keep separate maintenance records when devices use separate power sources.
Scenario 5: you want to avoid motor and battery servicing altogether
A gravity feeder removes the timed spinner’s battery requirement, but it changes how feed is dispensed and managed. It is a different equipment choice, rather than an electrical upgrade. Consider whether unrestricted access, feed choice, and refill frequency suit your intended use before switching. A battery problem alone should not decide the whole feeding system.
If that alternative fits your needs, compare the designs in our gravity deer feeder guide. Keep the comparison focused on your property and service routine. A timed feeder with repaired charging may remain the better fit when control over dispensing times is important to your setup.
A practical solar inspection at the feeder
Begin with a visual check before electrical measurements. Look for a dirty or damaged panel surface, a loose mount, leads that have pulled out of position, and connectors exposed to water. Photograph the installation so you can compare changes at later visits. A cable hanging near moving parts or an opening in the enclosure needs attention even if the feeder still runs.
Inspect the cable along its full accessible route. Damage can occur away from the battery connection, including where a wire rubs against an edge or where an animal can reach it. Our squirrel prevention guide covers the wider feeder problem. For electrical leads, use protection and routing suitable for the equipment rather than assuming a feeder guard protects every cable.
Then check the installation against the accessory instructions. Some charging products include control or reverse-current protection; others rely on components elsewhere in the system. Identify what is installed before adding parts. A solar charger sold for a feeder is not necessarily equivalent to a raw panel with similar lettering on its label.
If the manual provides a charging test, perform that test under the stated conditions. Record the result and the sunlight conditions. A single reading on a cloudy afternoon cannot establish the panel’s normal contribution across a day. Conversely, a good reading in bright sun does not guarantee adequate charging through several shaded or overcast days.
When the battery repeatedly fails despite a connected panel, ask a focused question: is the battery failing to accept charge, is charging insufficient, or is the load unexpectedly high? Each possibility points to a different remedy. Changing brands repeatedly without separating those causes can make the problem more expensive while leaving the installation unchanged.
Prepare a replacement at home before driving to the property
Open the package early enough to resolve a wrong model or shipping problem. Compare the label with the order and your equipment notes. Inspect the case, terminals, and packaging condition. A damaged, leaking, swollen, or unusually hot battery should not be installed as though it were an ordinary replacement. Follow the seller’s and manufacturer’s return or handling instructions.
Charge a rechargeable battery using the approved settings and procedure. Do not assume that a battery is ready for a full service interval because it operates immediately out of the box. Its charge state can depend on storage and shipping history. Keep the charging area appropriate for the battery and charger, and follow their instructions for ventilation, placement, and supervision.
Where the feeder instructions permit it, test the replacement with the equipment before the trip. Check that the timer powers up and that the test cycle behaves normally. A successful bench check does not duplicate cold weather or a fully loaded field installation, but it can reveal an obvious connection or supply problem while help and replacement parts are nearby.
Label the battery with an installation or purchase date without obscuring its specifications. Keep a photograph of the original label. Store order details and warranty information with the feeder record. If you manage several feeders, assign each one an ID and avoid moving batteries between them without updating the log. Otherwise, the history can become too confusing to interpret.
Pack for the specific job. Take the correct replacement, approved charger information, suitable tools, and the feeder’s test instructions. A replacement trip is also an opportunity to inspect the panel and connections. Finish with a recorded test result rather than relying on the fact that the timer display illuminated after installation.
Compare the true cost of two battery options
A useful comparison includes purchase price, required accessories, replacement visits, and the cost of adapting the system correctly. A cheaper battery that already matches your feeder can be a better purchase than a premium pack requiring a different charger and uncertain compatibility. A more expensive compatible setup can also make sense when it reduces servicing demands. Use your actual numbers instead of a generic payback promise.
| Cost item | Existing AGM setup | Proposed alternative |
|---|---|---|
| Battery purchase | $____ | $____ |
| Required charger / controller | $____ | $____ |
| Approved mounting / connections | $____ | $____ |
| Expected service trips, based on your records | ____ | ____ |
| Cost per additional trip | $____ | $____ |
| Total for your comparison period | $____ | $____ |
Do not fill the service-life row with a manufacturer’s maximum-life claim unless its conditions describe your application. Use a realistic range when you do not have records. A battery’s warranty period and expected field lifespan are different concepts. Read the warranty terms to understand what is covered and how a claim would be handled, rather than treating the warranty as a runtime guarantee.
For a simple hypothetical example, a $15 price difference equals the cost of three additional $5 items—but it may be smaller than the travel expense of a single extra visit. Your figures may be entirely different. The purpose is to make the comparison visible, not to declare a universal winner. Compatibility remains the first gate before any cost calculation.
Ten avoidable mistakes when replacing a deer feeder battery
- Buying by hopper brand alone. Check the installed motor and timer, especially when the feeder has been repaired or modified. The actual assembly determines the supply requirement.
- Ignoring the terminal suffix. Similar names can hide different connections. Match the selected variant with the old battery and the equipment instructions.
- Measuring only the battery case. Include terminals and attached leads. A battery that prevents normal lid closure is not a suitable fit.
- Using voltage as a performance ranking. A 12V label does not prove better throw, longer life, or compatibility with a 6V feeder.
- Assuming a solar panel guarantees charging. Shade, dirt, damaged leads, or an unsuitable charging arrangement can leave the battery undercharged.
- Using a generic vehicle charger without checking it. Small battery requirements differ. Confirm voltage, chemistry, current limits, and the appropriate mode.
- Trusting the display without a test cycle. A timer can operate even when the battery or connection cannot start the motor. Follow the model’s diagnostic procedure.
- Mixing battery chemistries casually. An approved lead-acid charging accessory may not support lithium. Verify the complete system before changing chemistry.
- Keeping an unmaintained spare. Backup equipment needs its own charge and storage routine. Check it before the trip rather than after the working battery fails.
- Changing several parts without a record. If the problem disappears, you may never learn which component mattered. Log the symptom, intervention, and result.
How to build your own useful battery evidence
If you want to compare batteries on your property, design the record before starting. Identify the feeder model, battery model and age, feed type, run schedule, charging accessory, panel exposure, and approximate weather conditions. Keep the setup consistent when possible. A comparison that changes battery type, feeder location, and schedule together cannot clearly attribute the outcome to the battery.
Define the outcome you want to observe. “Worked well” is too vague for a useful comparison. Record whether the feeder completed the approved test cycle, whether charging was required between visits, whether a fault appeared, and how long the battery remained in service. If you measure voltage, record the procedure and whether the reading was taken at rest or during a permitted load test.
Keep the distinction between observations and conclusions. “The battery completed today’s test cycle” is an observation. “This brand will last three years” is a prediction requiring much more evidence. Even a complete season from one installation does not establish what every reader should expect. Publishing the conditions and limitations makes the information more useful than a confident claim without a method.
Photographs should document the real installation: terminal fit, closed compartment, panel position, and relevant faults. Do not use an illustration as evidence that you tested a product. If you later add measured results to this article, retain the original dates and explain the revision. Readers should be able to tell which guidance comes from specifications, which from owner reports, and which from your own recorded work.
More questions before you buy
Can a battery have the correct voltage but still be unsuitable?
Yes. Physical shape, terminals, chemistry, current capability, and charging requirements can differ. Matching nominal voltage is necessary for the specified system, but it does not complete the compatibility check. Compare the exact battery and equipment documentation before ordering.
Should I buy a bigger battery because the feeder keeps dying?
Diagnose the charging and load first. An approved higher-capacity battery may add reserve, but it does not fix damaged connections, persistent shade, a failing charger, or mechanical drag. Establish why the existing battery goes flat before choosing the remedy.
Does a solar panel charge a battery at night?
No useful solar input is available without light. Your charging system should also handle reverse-current behavior appropriately. Check its documentation rather than adding a diode based on an unrelated owner modification. Overnight operation depends on the stored energy in the approved battery setup.
Can I connect a trail camera to the feeder battery?
Only through a configuration explicitly supported by the equipment manufacturers. A camera’s required voltage and connector can differ from the feeder’s. Shared power also changes demand and fault diagnosis. Keep the systems separate unless an approved arrangement establishes compatibility.
Is a cheap battery always a false economy?
No. A correctly specified replacement can provide good value without being premium-priced. The available evidence does not justify treating price as a reliable service-life ranking. Compare compatibility, seller support, required accessories, and your own maintenance records.
What should I photograph when asking for help?
Photograph the feeder or motor-kit label, battery label, terminal arrangement, timer display, charger or panel label, and the installed connections. Include the symptom and when it occurs. That information makes a manufacturer support request much more precise than “my feeder battery is bad.”
Choose the battery that fits—and verify the whole system
For a compatible 6V feeder, the Power-Sonic PS-640 F1 and Mighty Max ML5-6S serve different connection styles. For an approved 12V installation, the ML7-12 is another candidate to compare with your manual. Consider lithium only after verifying the complete charging and temperature requirements.
Choose deer feeder batteries with four checks: required voltage, physical fit, terminal connection and charging compatibility. Finish the job with a successful test cycle. That gives you better evidence than a battery indicator alone. For scheduling questions, see how many times a deer feeder should run each day and the best time of day to run a deer feeder.
Sources and evidence notes
- Power-Sonic PS-640 specifications and storage guidance.
- Mighty Max ML5-6S specifications.
- Mighty Max ML7-12 specifications.
- Texas Hunter 12V battery-and-solar kit listing.
- Boss Buck troubleshooting.
- Dakota Lithium battery troubleshooting and cold-charging guidance.
- GON: 6V or 12V feeder discussion — historical owner accounts summarized in the supplied dossier, not reverified full-thread evidence.
- TractorByNet: deer feeder batteries — same evidence limitation.
- Go2GBO: life of 6V feeder batteries — same evidence limitation.
- 2Cool: battery and solar charging discussion — same evidence limitation.
- Mighty Max buyer reviews — directly readable historical seller-hosted feedback.


